


In this article, you will learn all about how to install Linux from USB on your Windows XP computer. Clearly, there are various ways to do this, and not all of them are a piece of cake. Some methods for install Linux would require previous computer knowledge and skill which doesn’t make it appealing to ordinary users.
To help you out when it comes to installing Linux on your PC we have picked the easiest of methods.
To successfully apply the method we are about to share with you the only computer knowledge you would need is the knowledge to recognize the USB ports.
Check your computer for USB ports because the installation process will be via install Linux from a USB device. If your computer doesn’t have USB ports then it must be really, really old. The second thing we need is to check if your PC can support USB booting.
Guide How To Install Linux From USB
1. Visit www.OSDisc.com and search for the XubuntuLinux on a 32 gigabyte USB stick. When you find this title then click to order the stick.
2. Connect the stick to your PC.
3. Start the booting process and when the process is finished you can use the Linux system.
4. Enjoy the Linux operative system on your PC.
The best thing about this method is that everything remains unchanged on your computer; no files are deleted or unsupported. You can create files on Linux and save them on the stick you ordered. You can also use the Linux USB stick as an ordinary USB stick if you ever want to delete the Linux of it.
How to perform booting on a USB device
If your PC can already reboot from CDs, DVDs or other removable media, then it can certainly reboot from the USB too. Without the BIOS the initial starting of your PC would be impossible. The BIOS checks the list of devices that can perform the boot and uses the present and available device for that job.
Fg.1: To enter the BIOS- press Del. – when you initially start your computer a boot note will show informing you how to configure the BIOS. It would be something like in fg.1. Also, you shall receive notes on the configuration parameters of the startup devices. To change the BIOS setting you will have to use the function keys like F1, F2, F3, etc. Each of the function keys has a special task attached to it but you will figure what in the BIOS message itself.
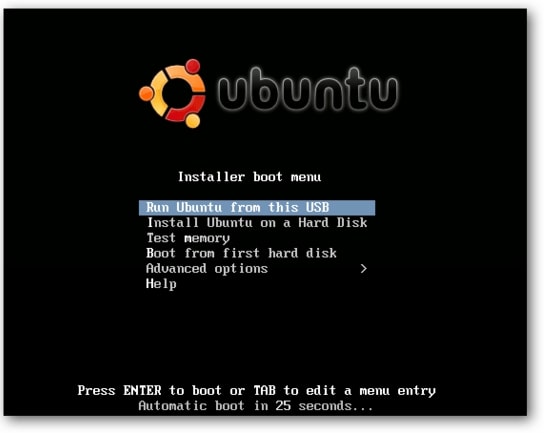
Fg2: In this figure will be shown to you the priority of the boot removable media. Sometimes there is a slight difference from screen to screen so don’t expect your ones to look identically to those in picture 2. Whatever you do with the settings try saving the changes you applied. Restart your PC and the automatic process of rebooting via the USB stick will commence. After the restart screen number one will appear offering two options: to install Xubuntu or to go with the try Xubuntu.
Important
Fg.3: Suppose you clicked on the option “try Xubuntu”. This means that the system got information to run the Linux from the USB stick where the portable Linux is placed.
Fg.4: Figure 4 shows the completed rebooting. After it, you will receive a new desktop on your PC.
Fg.5: In figure 5 is shown the application menu. You can see it if you click the mouse at the top left for this menu to open before you. If you want the application menu to be always visible for you ten click anywhere on the desktop with the right click of the mouse. A menu will appear on which you should pick the Panel option with a left-click and then, in the same fashion, click on Panel Preferences and remove the check on the box sitting before the option for –automatically show and hide the panel.
Fg.6: One figure 6 you can see the always visible dock. If you want to learn more about Xubuntu then visit their official web page.
Many users have opted for it because it belongs to the Edubuntu branch of Linux. Also, updates and upgrades are always fast and reliable. Install to Windows when it comes to the layout, other than that operative systems are completely different. In Xubunutu’s layout, mush as in Windows’ layout you can see the app menu and a panel of apps.